Author

Francis Ndungu
On this Page
How to Optimize PostgreSQL Connection Pooling with PgBouncer on Ubuntu 24.04
13 Apr, 2026
Introduction
PostgreSQL creates a new server process for each client connection, which consumes significant memory and CPU resources when handling hundreds or thousands of concurrent connections. PgBouncer is a lightweight connection pooler for PostgreSQL that manages a small pool of database connections and reuses them across multiple client requests. The tool reduces the overhead of establishing new connections, lowers memory consumption, and improves overall database performance for applications with high traffic. PgBouncer supports three pooling modes including session pooling, transaction pooling, and statement pooling, each suited for different application patterns.
This guide shows you how to install and configure PgBouncer for PostgreSQL connection pooling on Ubuntu 24.04.
Prerequisites
Before you start:
- Purchase an Ubuntu 24.04 VPS (Virtual Private Server) . If you don't have an Ubuntu VPS, sign up with Vultr and get upto $300 worth of free credit to test the Vultr platform.
-
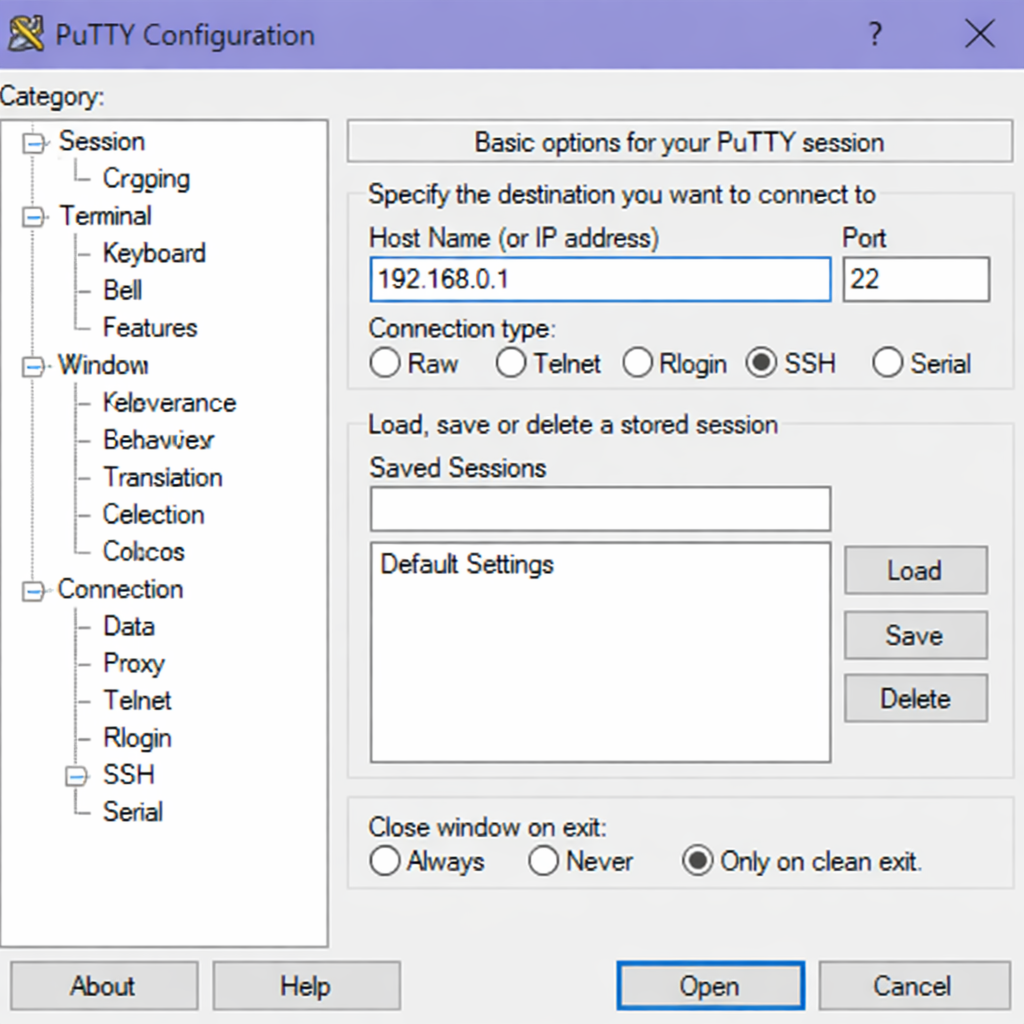
Connect to your server through SSH, replace
192.168.0.1with your VPS public IP address..-
Use PuTTY to connect to your VPS .
-
Run the following command in your shell.
console$ ssh username@192.168.0.1
-
-
Create a non-root user with sudo privileges. Read our guide on How to Create a Non-Root Sudo User on Ubuntu 24.04. You'll use this user's account to run the commands in this guide.
- Install a PostgreSQL database and set up user credentials to test this guide.
Install PgBouncer from Ubuntu Repository
The PgBouncer package is available in the default Ubuntu repositories. Installing from the official repository provides a stable version tested for Ubuntu compatibility.
-
Refresh your system's package list to ensure you get the latest available versions.
console$ sudo apt update -
Install the PgBouncer package.
console$ sudo apt install -y pgbouncerOutput:
consoleReading package lists... Done Building dependency tree... Done Reading state information... Done The following NEW packages will be installed: libevent-core-2.1-7 libevent-pthreads-2.1-7 pgbouncer 0 upgraded, 3 newly installed, 0 to remove and 0 not upgraded. Need to get 245 kB of archives. After this operation, 1,234 kB of additional disk space will be used. -
Verify the PgBouncer version.
console$ pgbouncer --versionOutput:
PgBouncer version 1.22.1
Configure PostgreSQL for PgBouncer Connections
PostgreSQL requires specific authentication settings to work properly with PgBouncer. You need to modify the PostgreSQL configuration to accept connections from the PgBouncer service.
-
Log in to the PostgreSQL server as a super user
console$ sudo -u postgres psqlWhen prompted, enter the password for the
postgresqluser. -
Obtain the SCRAM digest of the user that you want to use with PgBouncer.
postgresqlSELECT rolname, rolpassword FROM pg_authid WHERE rolname = 'your_database_user';Output:
postgresqlrolname | rolpassword -------------------+-------------------------------------------------------------- your_database_user | SCRAM-SHA-256$4096:sAG4+MLLKkTmXqdnh...YXi3qc= (1 row) -
Copy the output from
rolpasswordcolumn. For instanceSCRAM-SHA-256$4096:sAG4+MLLKkTmXqdnh...YXi3qc=. You'll need it later to configure PgBouncer password file. -
Log out from Postgresql
postgresqlpostgres=# \q
Configure PgBouncer
The main PgBouncer configuration file controls database connections, pooling behavior, and authentication settings. You need to define your PostgreSQL database as a connection target and set appropriate pool sizes.
-
Open the PgBouncer configuration file for editing.
console$ sudo nano /etc/pgbouncer/pgbouncer.ini -
Locate the
[databases]section and define your PostgreSQL database connection. Replace both occurences ofyour_databasewith the actual database you want to connect using PgBouncer.INI[databases] your_database = host=127.0.0.1 port=5432 dbname=your_database -
Locate the
[pgbouncer]section and ensure the listening address and port match the settings below.INI[pgbouncer] listen_addr = localhost listen_port = 6432 -
Locate the
;;; Authentication settingssection and ensure you've the following directives.INIauth_type = scram-sha-256 auth_file = /etc/pgbouncer/userlist.txtWarning
Do not change the
auth_typefromscram-sha-256totrustin production. This allows any client to connect without a password, creating a severe security vulnerability. -
Add
your_database_userto the following directives to ensure you can run PgBouncer stats .INIadmin_users = your_database_user stats_users = your_database_user -
Locate the
;pool_mode = sessionsetting and set it tosessionfor optimal performance.INIpool_mode = session -
Locate the following directives.
INI;; Total number of clients that can connect ;max_client_conn = 100 ;; Default pool size. 20 is good number when transaction pooling ;; is in use, in session pooling it needs to be the number of ;; max clients you want to handle at any moment ;default_pool_size = 20 ;; Minimum number of server connections to keep in pool. ;min_pool_size = 0 ; how many additional connection to allow in case of trouble ;reserve_pool_size = 0 -
Configure the maximum client connections and pool size.
INImax_client_conn = 1000 default_pool_size = 10 min_pool_size = 5 reserve_pool_size = 3Here is a breakdown of the above settings:
- max_client_conn = 1000: Maximum number of client connections PgBouncer will accept. These are connections from applications to PgBouncer, not directly to PostgreSQL.
- default_pool_size = 10: Maximum number of server connections PgBouncer will maintain per database/user pair. This controls how many PostgreSQL backends are used.
- min_pool_size = 5: Minimum number of server connections PgBouncer keeps open in the pool, even when idle. Ensures some connections are always ready.
- reserve_pool_size = 3 : Extra connections PgBouncer can open beyond the default pool size when demand spikes. Acts as a buffer for sudden load.
-
Save and close the
/etc/pgbouncer/pgbouncer.inifile by pressing Ctrl + X, then Y.
Create PgBouncer User Authentication File
PgBouncer maintains its own user authentication file separate from PostgreSQL. You need to add database users to this file with their encrypted passwords.
-
Create and open a new userlist file for PgBouncer.
console$ sudo nano /etc/pgbouncer/userlist.txt -
Enter the username followed by the SCRAM digest of the user that you generated earlier.
"your_database_user" "SCRAM-SHA-256$4096:sAG4+MLLKkTmXqdnh...YXi3qc=" -
Save and close the
/etc/pgbouncer/userlist.txtfile by pressing Ctrl + X , then Y. -
Secure the
userlist.txtfile.console$ sudo chmod 640 /etc/pgbouncer/userlist.txt -
Change ownership of the file to
postgres.console$ sudo chown postgres:postgres /etc/pgbouncer/userlist.txt
Manage PgBouncer Service
PgBouncer runs as a system service on Ubuntu under the name pgbouncer. You can manage this service using specific commands to start, stop, restart, and check the PgBouncer status.
Start PgBouncer Service
$ sudo systemctl start pgbouncer
Enable PgBouncer to Start on Boot
$ sudo systemctl enable pgbouncer
Output:
Synchronizing state of pgbouncer.service with SysV service script with /usr/lib/systemd/systemd-sysv-install.
Executing: /usr/lib/systemd/systemd-sysv-install enable pgbouncer
Restart PgBouncer Service
$ sudo systemctl restart pgbouncer
Verify PgBouncer is Running
$ sudo systemctl status pgbouncer
Output:
● pgbouncer.service - PgBouncer - lightweight connection pooler for PostgreSQL
     Loaded: loaded (/usr/lib/systemd/system/pgbouncer.service; enabled; preset: disabled)
     Active: active (running) since Wed 2026-03-15 09:45:22 UTC; 30s ago
       Docs: man:pgbouncer(1)
   Main PID: 12456 (pgbouncer)
      Tasks: 7 (limit: 2271)
     Memory: 2.5M (peak: 3.1M)
        CPU: 45ms
     CGroup: /system.slice/pgbouncer.service
             └─12456 /usr/bin/pgbouncer /etc/pgbouncer/pgbouncer.ini
Test PgBouncer Connection
Before integrating with your application, test that PgBouncer correctly proxies connections to PostgreSQL.
-
Connect to PostgreSQL through PgBouncer using the
psqlcommand. You should connect through port6432.console$ psql -h localhost -p 6432 -U your_database_user -d your_databaseOutput:
consolePassword for user myuser: psql (18.2 (Ubuntu 18.2-1ubuntu1), server 18.2 (Ubuntu 18.2-1ubuntu1)) Type "help" for help. your_database=>Note
PgBouncer listens on port
6432by default, while PostgreSQL listens on port5432. Your application must connect to port6432to benefit from connection pooling. -
Run a test query to verify the connection works.
postgresqlyour_database=> SELECT version();Output:
consoleversion --------------------------------------------------------------------------------- PostgreSQL 16.13 (Ubuntu 16.13-0ubuntu0.24.04.1) on x86_64-pc-linux-gnu, compiled by gcc (Ubuntu 13.3.0-6ubuntu2~24.04.1) 13.3.0, 64-bit (1 row) -
Exit the PostgreSQL prompt.
postgresqlyour_database=> \q
PgBouncer Connection Methods for Popular Programming Languages
PgBouncer works seamlessly with any programming language that supports PostgreSQL connections. You only need to change the port from the default PostgreSQL port 5432 to the PgBouncer port 6432. The connection code remains the same in all other aspects. The examples below show how to connect to PgBouncer using Python, Go, and Node.js.
import psycopg2

conn = psycopg2.connect(
    host="localhost",
    port=6432,
    database="your_database",
    user="your_database_user",
    password="your_password"
)

cur = conn.cursor()
cur.execute("SELECT version();")
version = cur.fetchone()
print(version)

cur.close()
conn.close()
package main

import (
    "database/sql"
    "fmt"
    "log"
    _ "github.com/lib/pq"
)

func main() {

    connStr := "host=localhost port=6432 dbname=your_database user=your_database_user password=your_password sslmode=disable"

    db, err := sql.Open("postgres", connStr)
    if err != nil {
        log.Fatal(err)
    }
    defer db.Close()

    var version string
    err = db.QueryRow("SELECT version();").Scan(&version)
    if err != nil {
        log.Fatal(err)
    }
    fmt.Println(version)
}
const { Client } = require('pg');

const client = new Client({
    host: 'localhost',
    port: 6432,
    database: 'your_database',
    user: 'your_database_user',
    password: 'your_password'
});

async function connectAndQuery() {
    try {
        await client.connect();
        const res = await client.query('SELECT version();');
        console.log(res.rows[0]);
    } catch (err) {
        console.error(err);
    } finally {
        await client.end();
    }
}

connectAndQuery();
Monitor PgBouncer Statistics
PgBouncer provides a built-in admin console for monitoring connection pools, request rates, and performance metrics.
-
Connect to the PgBouncer admin console as
your_database_user.console$ psql -h localhost -p 6432 -U = your_database_usery pgbouncerOutput:
consolePassword for user = yyour_database_usery: psql (18.2 (Ubuntu 18.2-1ubuntu1), server 1.22.1/pgbouncer) Type "help" for help. pgbouncer=> -
Show overall statistics.
postgresqlpgbouncer=> SHOW STATS;Output:
postgresqldatabase | total_requests | total_received | total_sent | total_query_time | avg_req | avg_recv | avg_sent | avg_query --------------+----------------+----------------+------------+------------------+---------+----------+----------+----------- mydatabase | 125 | 45678 | 98765 | 123456 | 0 | 365 | 790 | 987 pgbouncer | 0 | 0 | 0 | 0 | 0 | 0 | 0 | 0 (2 rows) -
Show active connection pools.
postgresqlpgbouncer=> SHOW POOLS;Output:
postgresqldatabase | user | cl_active | cl_waiting | sv_active | sv_idle | sv_used | sv_tested | sv_login | maxwait --------------+----------+-----------+------------+-----------+---------+---------+-----------+----------+--------- mydatabase | myuser | 5 | 0 | 3 | 2 | 0 | 0 | 0 | 0 pgbouncer | pgbouncer| 1 | 0 | 0 | 0 | 0 | 0 | 0 | 0 (2 rows) -
Show client and server connection lists.
postgresqlpgbouncer=> SHOW CLIENTS; pgbouncer=> SHOW SERVERS; -
Exit the admin console.
postgresqlpgbouncer=> \qTip
When benchmarking PgBouncer, always monitor both connection latency and pool utilization.
This ensures you’re measuring real-world efficiency rather than just raw throughput.
Conclusion
You installed PgBouncer on Ubuntu 24.04 and configured PostgreSQL authentication for pooled connections. You then set up pool settings including max_client_conn and default_pool_size, created the userlist file, and tested the connection through port 6432. After implementing PgBouncer, your PostgreSQL database can now handle hundreds of concurrent connections with reduced memory usage. With a ready optimized connection, you can now connect your database to your application such as Fast API.
PgBouncer FAQs for Connection Pooling
What is PgBouncer used for?
PgBouncer reduces the number of connections PostgreSQL has to handle. It takes many client connections and pools them into a few server connections, saving memory and CPU resources.
What port does PgBouncer listen on?
PgBouncer listens on port 6432 by default. PostgreSQL listens on port 5432. Your application must connect to port 6432 to use the connection pooler.
How do I restart PgBouncer after changing settings?
Run sudo systemctl restart pgbouncer to restart the service. For a safer reload that does not drop active connections, run sudo systemctl reload pgbouncer instead.
Where does PgBouncer store its configuration files?
The main configuration file is located at /etc/pgbouncer/pgbouncer.ini. The user authentication file is located at /etc/pgbouncer/userlist.txt. Both files require postgres as the owner.
How do I check if PgBouncer is running correctly?
Run sudo systemctl status pgbouncer to see the service status. You can also run psql -h localhost -p 6432 -U your_user -d pgbouncer and type SHOW STATS; to view live statistics.
Can I use PgBouncer with PostgreSQL on a different server?
Yes. Change the host value in the [databases] section from 127.0.0.1 to the remote PostgreSQL server's IP address. Ensure both servers can communicate over the network.
