Author

Francis Ndungu
On this Page
How to Install WordPress Content Management System on Ubuntu 26.04
07 May, 2026
Introduction
WordPress is the world's most popular open-source content management system (CMS) that powers over 40% of all websites on the internet. This flexible platform allows you to create blogs, business websites, e-commerce stores, portfolios, and membership sites without writing code from scratch. WordPress provides a user-friendly administrative dashboard where you can create pages, write posts, upload media, install themes, and add plugins to extend functionality. The software handles both simple personal blogs and complex corporate websites with thousands of pages, making it a versatile choice for users of all skill levels.
This guide shows you how to install WordPress on Ubuntu 26.04 with a LAMP stack (Linux, Apache, MySQL, PHP).
Prerequisites
Before you start:
- Purchase an Ubuntu 26.04 VPS (Virtual Private Server) . If you don't have an Ubuntu VPS, sign up with Vultr and get upto $300 worth of free credit to test the Vultr platform.
-
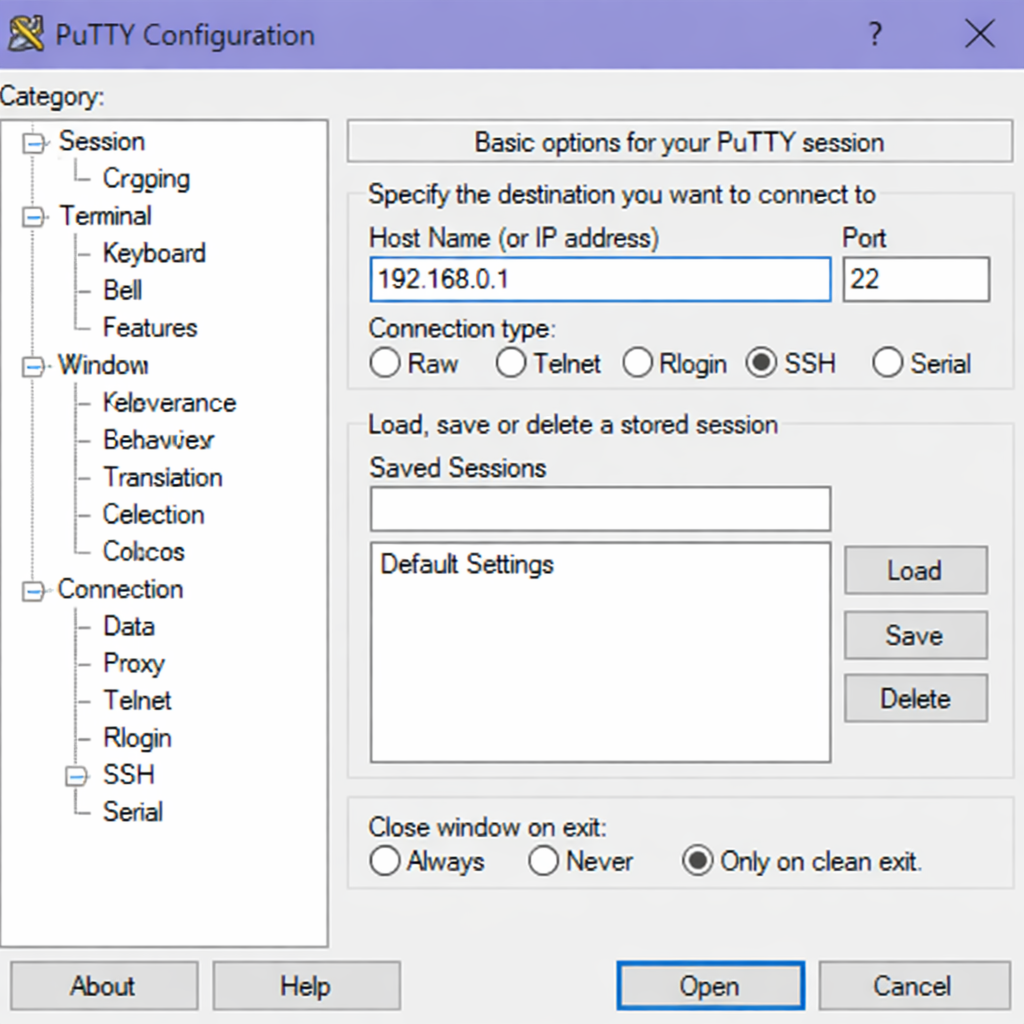
Connect to your server through SSH, replace
192.168.0.1with your VPS public IP address..-
Use PuTTY to connect to your VPS .
-
Run the following command in your shell.
console$ ssh username@192.168.0.1
-
-
Create a non-root user with sudo privileges. Read our guide on How to Create a Non-Root Sudo User on Ubuntu 24.04. You'll use this user's account to run the commands in this guide.
-
Purchase a domain name. For instance
example.comfrom a domain registrar such as Namecheap.
Install the LAMP Stack
WordPress requires a web server, a database server, and PHP to function. The LAMP stack provides these components. You install each component separately to build a fully functional WordPress environment.
-
Refresh your system package list to get the latest available versions.
console$ sudo apt update -
Install Apache, the web server software that serves WordPress files to visitors' browsers.
console$ sudo apt install -y apache2Output:
Reading package lists... Done Building dependency tree... Done Reading state information... Done The following additional packages will be installed: apache2-bin apache2-data apache2-utils libapr1 libaprutil1 libaprutil1-dbd-sqlite3 libaprutil1-ldap liblua5.4-0 ssl-cert 0 upgraded, 9 newly installed, 0 to remove and 0 not upgraded. Need to get 1,892 kB of archives. After this operation, 8,235 kB of additional disk space will be used. -
Install MySQL, the database server that stores WordPress content, user data, and settings.
console$ sudo apt install -y mysql-serverOutput:
Reading package lists... Done Building dependency tree... Done Reading state information... Done The following additional packages will be installed: mysql-client-9.0 mysql-client-core-9.0 mysql-common mysql-server-9.0 mysql-server-core-9.0 0 upgraded, 5 newly installed, 0 to remove and 0 not upgraded. Need to get 27.4 MB of archives. After this operation, 193 MB of additional disk space will be used. -
Install PHP and the required extensions that WordPress needs to process dynamic content.
console$ sudo apt install -y php libapache2-mod-php php-mysql php-curl php-gd php-mbstring php-xml php-xmlrpc php-soap php-intl php-zipOutput:
Reading package lists... Done Building dependency tree... Done Reading state information... Done The following additional packages will be installed: php-common php8.3-cli php8.3-common php8.3-curl php8.3-gd php8.3-intl php8.3-mbstring php8.3-mysql php8.3-soap php8.3-xml php8.3-zip 0 upgraded, 28 newly installed, 0 to remove and 0 not upgraded. Need to get 5,843 kB of archives. After this operation, 32.8 MB of additional disk space will be used. -
Verify the PHP version to confirm a successful installation.
console$ php --versionOutput:
PHP 8.3.15 (cli) (built: Jan 20 2026 10:15:23) (NTS)
Copyright (c) The PHP Group
Zend Engine v4.3.15, Copyright (c) Zend Technologies
Create a Database for WordPress
WordPress stores all its content, user profiles, and configuration settings in a MySQL database. You create a dedicated database and a user account with specific permissions for WordPress to access this database.
-
Connect to the MySQL shell as the root user.
console$ sudo mysqlOutput:
Welcome to the MySQL monitor. Commands end with ; or \g. Your MySQL connection id is 8 Server version: 9.0.1 MySQL Community Server - GPL mysql> -
Create a new database for your WordPress installation.
MySQLmysql> CREATE DATABASE wordpress_db;Output:
Query OK, 1 row affected (0.01 sec) -
Create a database user and set a strong password for that user.
MySQLmysql> CREATE USER 'wp_user'@'localhost' IDENTIFIED BY 'StrongPassword123!';Output:
Query OK, 0 rows affected (0.00 sec) -
Grant the new user full permissions on the WordPress database.
MySQLmysql> GRANT ALL PRIVILEGES ON wordpress_db.* TO 'wp_user'@'localhost';Output:
Query OK, 0 rows affected (0.00 sec) -
Reload the privilege tables to apply the new permissions immediately.
MySQLmysql> FLUSH PRIVILEGES;Output:
Query OK, 0 rows affected (0.00 sec) -
Exit from the MySQL shell.
MySQLmysql> EXIT;Output:
Bye
Download and Configure WordPress
After setting up the database, you download the WordPress files and configure them to connect with your database. This process involves retrieving the latest WordPress package, setting proper file permissions, and creating the configuration file.
-
Install the
unziputility to extract the WordPress archive.console$ sudo apt install -y unzip -
Navigate to the Apache web root directory.
console$ cd /var/www/html -
Download the latest WordPress package from the official repository using
curl.console$ sudo curl -O https://wordpress.org/latest.zip -
Extract the downloaded WordPress archive.
console$ sudo unzip latest.zipOutput:
Archive: latest.zip creating: wordpress/ inflating: wordpress/index.php inflating: wordpress/license.txt inflating: wordpress/readme.html inflating: wordpress/wp-activate.php ... (additional extraction output) -
Change ownership of the WordPress directory to the Apache web server user.
console$ sudo chown -R www-data:www-data /var/www/html/wordpress -
Navigate into the WordPress directory to work with the configuration files.
console$ cd /var/www/html/wordpress -
Copy the sample configuration file to create the active configuration file.
console$ sudo cp wp-config-sample.php wp-config.php -
Open the new configuration file with the nano text editor.
console$ sudo nano wp-config.php -
Locate the database settings section in the file.
PHPdefine( 'DB_NAME', 'database_name_here' ); define( 'DB_USER', 'username_here' ); define( 'DB_PASSWORD', 'password_here' ); define( 'DB_HOST', 'localhost' ); -
Replace the placeholder values with your actual database credentials.
PHPdefine( 'DB_NAME', 'wordpress_db' ); define( 'DB_USER', 'wp_user' ); define( 'DB_PASSWORD', 'StrongPassword123!' ); define( 'DB_HOST', 'localhost' );Save and close the
/var/www/html/wordpress/wp-config.phpfile by pressing Ctrl + X, Y then Enter.
Configure Apache for WordPress
Apache needs a virtual host configuration to serve your WordPress site correctly. This configuration tells Apache how to handle requests for your domain and where to find the WordPress files.
-
Create a new virtual host configuration file for your WordPress site.
console$ sudo nano /etc/apache2/sites-available/wordpress.conf -
Add the following configuration to the new file. Replace
your-domain.comwith your actual domain name.ApacheConf<VirtualHost *:80> ServerAdmin admin@your-domain.com ServerName your-domain.com ServerAlias www.your-domain.com DocumentRoot /var/www/html/wordpress <Directory /var/www/html/wordpress> Options FollowSymLinks AllowOverride All Require all granted </Directory> ErrorLog ${APACHE_LOG_DIR}/wordpress_error.log CustomLog ${APACHE_LOG_DIR}/wordpress_access.log combined </VirtualHost>Save and close the
/etc/apache2/sites-available/wordpress.conffile by pressing Ctrl + X, Y then Enter. -
Disable the default Apache site to avoid configuration conflicts.
console$ sudo a2dissite 000-default.confOutput:
Site 000-default disabled. To activate the new configuration, you need to run: systemctl reload apache2 -
Enable the new WordPress site.
console$ sudo a2ensite wordpress.confOutput:
Enabling site wordpress. To activate the new configuration, you need to run: systemctl reload apache2 -
Enable the Apache
mod_rewritemodule, which WordPress uses for permalinks.console$ sudo a2enmod rewriteOutput:
Enabling module rewrite. To activate the new configuration, you need to run: systemctl restart apache2 -
Restart the Apache web server to load all configuration changes.
console$ sudo systemctl restart apache2
Secure WordPress with SSL Certificate
SSL (Secure Sockets Layer) encrypts data between your visitors' browsers and your server. This security measure protects login credentials, form submissions, and other sensitive information. You use Certbot to obtain a free SSL certificate from Let's Encrypt.
-
Install the Certbot tool and its Apache plugin.
console$ sudo apt install -y certbot python3-certbot-apache -
Obtain and install the SSL certificate for your domain.
console$ sudo certbot --apache -d your-domain.com -d www.your-domain.comOutput:
Saving debug log to /var/log/letsencrypt/letsencrypt.log Enter email address (used for urgent renewal and security notices): your-email@example.com Please read the Terms of Service at https://letsencrypt.org/tos/. You must agree in order to register with the ACME server at https://acme-v02.api.letsencrypt.org/directory (A)gree/(C)ancel: A Would you be willing to share your email address with the Electronic Frontier Foundation, a founding partner of the Let's Encrypt project and the non-profit organization that develops Certbot? (Y)es/(N)o: N Redirecting all traffic on port 80 to ssl in /etc/apache2/sites-available/wordpress-le-ssl.conf Congratulations! You have successfully enabled HTTPS on https://your-domain.com -
Verify that the SSL certificate installed correctly by checking the Apache configuration.
console$ sudo apache2ctl configtestOutput:
Syntax OK
Complete WordPress Installation via Web Interface
With all components configured, you complete the WordPress installation through the web interface. This step sets up your site title, creates an administrator account, and configures basic settings.
-
Open your web browser and navigate to your domain:
https://your-domain.com -
Select your preferred language from the dropdown menu and click Continue.
-
On the next screen, enter the following information:
Field Value Site Title Your Website Name Username Choose a secure username (not "admin") Password Create a strong password Your Email Your administrative email address -
Click Install WordPress to complete the installation.
Output:
Success! WordPress has been installed. Thank you, and enjoy! -
Click Log In to access your WordPress administration dashboard.
-
Enter your username and password on the login screen, then click Log In.
Your WordPress site is now fully installed and ready for content creation.
Test the WordPress Installation
After completing the web installation, you test your WordPress setup by accessing the front end of your site and verifying that the administration dashboard works correctly.
-
Visit your domain
https://your-domain.comto view the default WordPress front page.The page displays your site title and a sample post titled "Hello world!"
-
Navigate to the WordPress administration dashboard at
https://your-domain.com/wp-adminThe login screen appears, allowing you to access all administrative features.
-
Log in with the administrator credentials you created during the web installation.
The WordPress dashboard loads, showing modules for posts, pages, appearance settings, and plugin management.
-
Create a test post to verify database functionality.
From the dashboard:
1. Click "Posts" in the left sidebar
2. Click "Add New Post"
3. Enter a title like "Test Post"
4. Add some sample content
5. Click "Publish"
The post appears on your site's front page, confirming that the database connection works correctly.
Your WordPress installation is functioning as expected.
Conclusion
In this guide, you have installed WordPress on Ubuntu 26.04 with a complete LAMP stack, created a dedicated MySQL database for WordPress content, configured Apache with a virtual host and SSL certificate, and completed the setup through the WordPress web interface. Now that you have WordPress running, consider exploring the official WordPress theme directory to customize your site appearance, installing security plugins like Wordfence to protect against threats, or adding caching plugins such as W3 Total Cache to improve page load speeds for your visitors.
